Applications of SSH
From Computing and Software Wiki
| Line 25: | Line 25: | ||
<br clear=all/> | <br clear=all/> | ||
==SSH Tunneling== | ==SSH Tunneling== | ||
| - | |||
| - | |||
{|align="right" | {|align="right" | ||
|- | |- | ||
| - | | [[Image: | + | | [[Image:Puttytunnel.png|thumb|PuTTY Tunnel Settings]] |
|- | |- | ||
| - | | [[Image: | + | | [[Image:Firefoxproxy.png|thumb|Firefox Proxy Settings]] |
|} | |} | ||
| + | |||
One of the many benefits of SSH is that you can create an encrypted tunnel from a port on the client machine to a port on the server machine. This allows the client to access services and daemons on the server that are not exposed to the internet. The traffic is sent to the port of the SSH server, decrypted by the server and then forwarded to the port requested by the client. One useful application of this is providing remote access to a Squid proxy server through Windows. | One of the many benefits of SSH is that you can create an encrypted tunnel from a port on the client machine to a port on the server machine. This allows the client to access services and daemons on the server that are not exposed to the internet. The traffic is sent to the port of the SSH server, decrypted by the server and then forwarded to the port requested by the client. One useful application of this is providing remote access to a Squid proxy server through Windows. | ||
| Line 43: | Line 42: | ||
# Set the radio button to Manual Proxy Configuration and type localhost in the HTTP Proxy field and 3128 in the port. | # Set the radio button to Manual Proxy Configuration and type localhost in the HTTP Proxy field and 3128 in the port. | ||
| - | + | [[Image:sshtunnel.jpg|left|500px|thumb|SSH Tunnel]] | |
| - | + | ||
| - | + | ||
<br clear=all/> | <br clear=all/> | ||
==X11 Forwarding== | ==X11 Forwarding== | ||
| + | # Set up the SSH server to allow X11 forwarding by making sure the option:<BR><code>X11Forwarding yes</code><BR>is set in /etc/ssh/sshd_config | ||
| + | # Install Xming and PuTTY on the client machine. | ||
| + | # Set up Xming to listen on 0.0 | ||
| + | # Set up PuTTY to forward X11 by going to Connection > SSH > X11, selecting the "Enable X11 Forwarding" checkbox and typing "localhost:0.0" into the "X display location" box. | ||
| + | # Connect to the SSH server and test it out by typing "xclock &" | ||
<br clear=all/> | <br clear=all/> | ||
| Line 58: | Line 60: | ||
<br clear=all/> | <br clear=all/> | ||
==References== | ==References== | ||
| - | * | + | *[http://solaris.reys.net/english/2006/04/x11_forwarding More on X11 Forwarding] |
| + | *[http://www.ssh.com/support/documentation/online/ssh/winhelp/32/Tunneling_Explained.html SSH Tunneling Explained] | ||
<br clear=all/> | <br clear=all/> | ||
Revision as of 23:46, 13 April 2008
SSH (Secure Shell) is an encrypted network protocol. It has many useful applications that solve all kinds of communication and security problems.
Contents |
Secure Shell
The most obvious use for SSH is to allow remote machines to access a shell on the host computer. The host machine must be running an SSH Daemon (sshd) which usually runs on port 22. The remote machine must use an SSH client to connect to the host. On Unix based systems, the command "ssh hostname" will connect to the host specified by hostname with the same username as the user running the command. Alternatively, the user can type "ssh username@hostname" to log in as a different user. In either case, the user will usually be asked to enter the password for the specified user on the host.
File Transfer Using SCP
SCP is a way to securely copy files. It is a part of the SSH protocol. The SCP command can be invoked at the command line, but there are easier methods. WinSCP provides an easy to use GUI to the SCP file copy protocol.
- Download and install WinSCP from here.
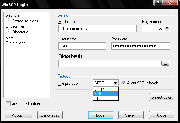
- Start the program and click "New"
- Enter the host, user name and password as well as the type of protocol (SCP in this case).
- To save this information to the computer, click Save. Note that this will save the password in an easily recoverable format. A prompt appears asking you if you are sure. Otherwise, for a single Login, just click Login.
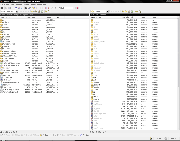
- The pane on the left is the local computer and the pane on the right is the remote computer.
- To copy files from one side to the other, select the files and hit F5 or the Copy button at the bottom of the screen. Alternatively the user can drag/drop files from one pane to the other.
Note: The default interface is the "Norton Commander interface shown here. The interface can be changed to an Explorer-like interface by clicking Options > Preferences > Interface and choosing the Explorer-like radio button. This interface only displays the remote directory and allows the user to drag/drop files similar to how they would in Windows Explorer.
SSH Tunneling
One of the many benefits of SSH is that you can create an encrypted tunnel from a port on the client machine to a port on the server machine. This allows the client to access services and daemons on the server that are not exposed to the internet. The traffic is sent to the port of the SSH server, decrypted by the server and then forwarded to the port requested by the client. One useful application of this is providing remote access to a Squid proxy server through Windows.
- Set up the squid proxy on the server machine. Make a note of the port that the server is running on. (The default is 3128)
- Get PuTTY on the client machine and set up a session with the host.
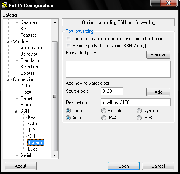
- Go to the Connection > SSH > Tunnels screen in PuTTY.
- Add a tunnel from local port 3128 (source port) to port 3128 on the server (destination).
- Save these settings and connect to the server.
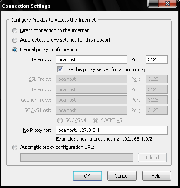
- Set up the proxy in Firefox by going to Tools > Options > Advanced > Network and click on Settings.
- Set the radio button to Manual Proxy Configuration and type localhost in the HTTP Proxy field and 3128 in the port.
X11 Forwarding
- Set up the SSH server to allow X11 forwarding by making sure the option:
X11Forwarding yes
is set in /etc/ssh/sshd_config - Install Xming and PuTTY on the client machine.
- Set up Xming to listen on 0.0
- Set up PuTTY to forward X11 by going to Connection > SSH > X11, selecting the "Enable X11 Forwarding" checkbox and typing "localhost:0.0" into the "X display location" box.
- Connect to the SSH server and test it out by typing "xclock &"
See Also
References


